Cultivating a trusting relationship with our patients and with our dental laboratory partners through high levels of communication is the key to not only patient loyalty but also to the delivery of the highest level of dental care. It requires a dedication to the rarest and most elusive commodity in the dental practice and that is the commitment of time. Time to educate ourselves on the latest evidence-based techniques, materials, and practices. Time to build a relationship with our patients and our professional partners and the time to understand how to effectively communicate with both.
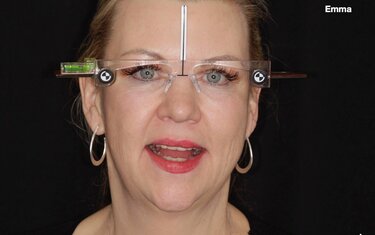
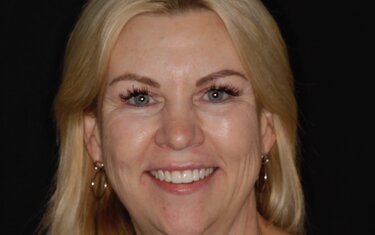
Recently a new female patient with a common complaint presented to my practice for consultation. She was unhappy with her smile (Figure 1) and had been referred by a friend, who was delighted by the recent smile enhancement our practice had provided. She was most concerned with her 15-year-old porcelain-fused-to-metal anterior maxillary crowns, which had become discolored and made her look older than her 49 years of age. In addition, she had noticed the formation of a black space between teeth #8 and #9, which she wanted fixed.
In cases like this, the expectation of most patients is that the dentist will simply replace the anterior crowns to create a more esthetically pleasing smile. For the discerning clinician, however, the consultation appointment can reveal much more about underlying esthetic issues that cannot be addressed by simple crown replacement and presents an opportunity to educate and motivate the patient to consider a more comprehensive treatment plan.
Listening to her concerns, I watched her mouth as she spoke and smiled. I paid careful attention to her smile line and facial symmetry, lip line, and buccal corridor. I assured her that we could address her esthetic issues and concerns and requested she return for a series of photographs that I would need to help explain how I would restore the youthfulness and esthetic appearance of her smile. These photographs would also serve as a critical communication tool for the dental laboratory.
Power of Digital Photography
When the patient returned for her second appointment, a complete series of clinical digital photographs of her oral situation were taken using Kois Facial Reference glasses and a black poster board positioned behind the patient (Figure 2). The glasses aid in correctly aligning the face and in examining the correct position of the midline and angulation. As I explained to the patient, the intent of the photo documentation was to capture the dynamics of her current smile for complete analysis and to identify any challenges that might impact the treatment plan.
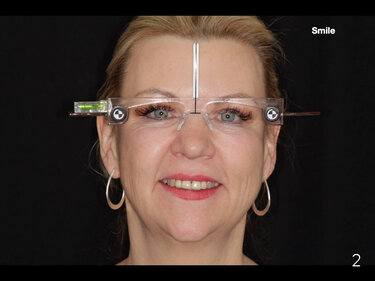
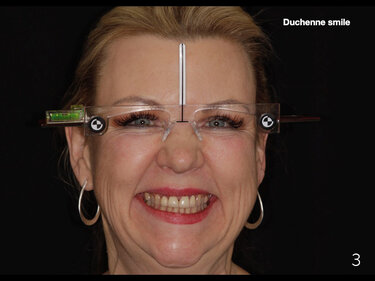
Figure 2: Every smile design case is planned using the Kois Facial Reference glasses. These glasses are used to correctly align the face and assure correct midline and angulation. A “smile” shot portrays how the patient would smile when taking a normal picture.
Figure 3: A “Duchenne smile” portrays the patient laughing very hard and is more natural than a posing smile shot. I use this image to show if gingival/osseous crown lengthening is needed to balance the smile and to view the buccal corridors. It will determine if I will need to extend the treatment to the posterior teeth to create a more full smile.
Using Keynote software as both an analytical and patient presentation tool, I presented my findings to the patient. In laymen’s terms I showed her the imbalance of her smile and how we could address that issue by lengthening and reshaping the contours of her front teeth and extending treatment to her posterior teeth to create a more full, balanced smile (Figures 3, 4 and 5). Until she was presented with the right and left lateral views of her teeth (Figures 6 and 7), she had been completely unaware of the black triangles between teeth #10-#11 and #6-#7. I explained why gaps between teeth form and the need to close these spaces so they do not enlarge further and encourage the buildup harmful elements that present a higher risk of dental caries and gum inflammation. To best illustrate the presence of gum inflammation I then presented the retracted view of her anterior crowns where gingival inflammation was visible around teeth #7-#10 (Figure 8) as well as the gap between teeth #8 and #9. I also showed her the stick bite image (Figure 9) where the imbalance of her smile was most visible and explained how lengthening the posterior teeth on the right of her mouth would bring her smile in parallel to the horizontal plane of her eyes and thus “straighten” and balance her smile.

Figure 5: A close up smile shot allows viewing the shape, contours, buccal corridors and length of the teeth.
Figure 6: A close up view of the black triangle between teeth #10-#11.
Figure 7: A close-up of the spacing between teeth #7-#8.
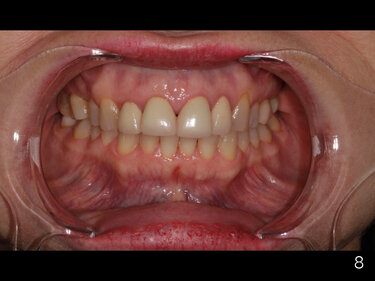
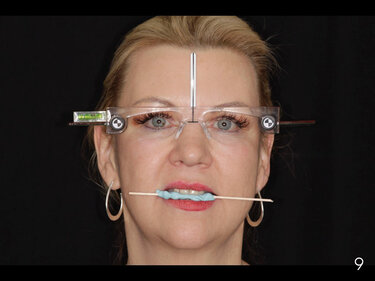
Figure 8: Retracted view of gingival inflammation around crowns #7-#10 and the black triangle between teeth #8 and #9.
Figure 9: Use of the bite stick with the Kois Facial Reference glasses helps determine the degree of cant that will be addressed to better align her smile.
he treatment plan that I recommended was to reshape the contours and length of the anterior crowns on teeth #7, #8, #0 and #10 and place minimal prep veneers on teeth #4, #6, #11, and #13 to extend her buccal corridor and bring her smile line into full symmetry. I also recommended osseous recontouring of teeth #6 and #7 to close the black space between the teeth. I explained that I could address closing the black triangle between teeth #10 and #11 when prepping the teeth for veneers.
To restore her teeth, I recommended that we use a metal-free all ceramic lithium disilicate material and prescribed IPS e.max Press® in shade HTBL3. I told her that I use IPS e.max® for all my cosmetic cases because it best mirrors the life-like appearance of natural dentition and that research has demonstrated this material to be exceptionally durable over its more than 15 years on the market. Dental professionals around the world prescribe IPS e.max due to its reputation for superior esthetics, durability and ease of cementation. Our goal I explained was not only to give her a more youthful, natural looking smile but also to improve her overall health by restoring the health of the gum tissue around her teeth.
With the patient’s approval of the treatment proposal, I scanned her pre-op condition using an iTero intraoral scanner and sent the digital scan, the complete series of digital images, and detailed prescription to the dental laboratory for creation of a diagnostic waxup as well as a putty matrix for fabrication of the temporaries. The patient’s expectations and my treatment goals were carefully detailed.
I also noted to the laboratory the position of the interproximal bone between teeth #10 and #11. The bone measured 4mm on the distal of #10 and mesial of #11, which would be addressed when I prepped the teeth for the two veneers so that the tissue would fill in nicely after the restorations were bonded.
At the preparation appointment, teeth #7-#10 were prepped for the new IPS e.max crowns and teeth #5, #6, #11, and #13 for minimally preparation veneers. The gingival asymmetry of teeth #6 and #7 was addressed by trimming the gingival tissue to match. A bleach shade was chosen for fabricating the Telio® C&B temporary restorations. The veneer preparations were spot etched using Variolink® Esthetic LC luting composite and the crown preparations etched with Variolink® Esthetic DC, both in neutral shade. The luting composite was air dried and the putty matrix loaded with Telio C&B temporary material inserted into the mouth, making sure the embrasures were slightly open to encourage the papilla to fill in prior to seating the final restorations. We scheduled the patient for a follow-up appointment a week later to check occlusion and another appointment four weeks later to check on functionality and healing of the gingival tissue (Figure 10). The patient was very pleased with the form and function of the temporaries and requested no changes.
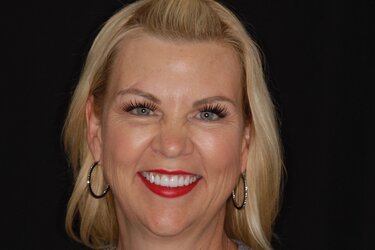
Figure 11: Final seated restorations after four weeks.
Although delivery and seating of the final restorations was postponed due to the Covid-19 shutdown, she eventually received her final restorations and was extremely happy with the highly esthetic smile rehabilitation (Figure 11).
As dentists our responsibility extends beyond our ability to restore a patients oral health to that of educating patients on how oral health is the foundation for overall health. Engaging patients in the diagnostic and treatment proposal process empowers them to be part of the decision-making process. Digital photography is the most powerful teaching tool we have for showing and explaining to patients the concerns we have for their oral health and engaging patients in the treatment discussion and guiding them to case acceptance.
Receive our monthly newsletter on recently published blog articles, upcoming education programs and exciting new product campaigns!

