Originally printed in Dental Products Report, September 2024
Written by Nisha Krishnaiah, DDS; and Brad Jones, FAACD
As our patients’ expectations continue to rise, it becomes profoundly important to use tried and tested protocols and techniques that deliver beautiful and predictable results. This article details the clinical and technical aspects of transforming severe dark brown–stained teeth to a natural, gorgeous smile.
This case had 2 main objectives. The first was to take away the tetracycline stains, and the second was to pull back the splaying of the upper anterior teeth. Additionally, we wanted to brighten, refine, and harmonize the patient’s smile.
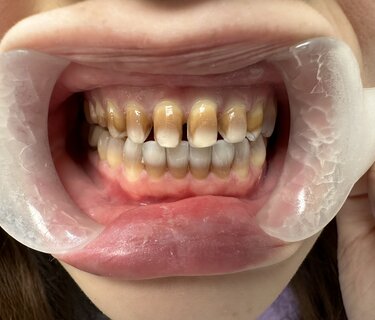
Our patient presented with prenatal exposure to the antibiotic tetracycline. Her dentition had severe dark brown staining (Figures 1-4). This appearance is a result of tetracycline binding to calcium ions in teeth during mineralization, or calcification. The phenotypic result can vary between gray, brown, or greenish hues and varying degrees of each.
In our patient’s case, it was a deep, dark brown color on the severe end of tetracycline staining. She stated she hated to smile, and when she did smile, she tried to show as little of her teeth as possible. She desired a change and was seeking more information about treatment options.
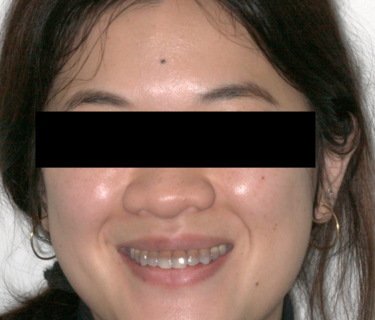
Although the patient was fixated on the darkness of the staining, the length/protrusion of her upper anterior teeth were not obvious to her because they were overshadowed by the dark colors. The patient expressed several reservations as the discussion progressed. First, due to her family culture, her parents did not approve changing her smile. Thus, her parents were not going to be involved in the decision-making. Second, cost was a factor. Lastly, she wanted the case to have minimal preparation, as she was not comfortable with too much tooth reduction. We discussed all her concerns and addressed them to her satisfaction. Once she decided to move forward, we involved the ceramist.
Brad Jones, FAACD, fellowed master ceramist with the American Academy of Cosmetic Dentistry, created a diagnostic wax-up and clear matrix along with a reduction stent. This diagnostic wax-up is essentially the blueprint of the proposed final shape/form. The patient was able to visualize our mutual goals, and as a result, the patient felt at ease to move forward.
The patient presented with a prenatal exposure to tetracycline dentition, had [a] severe staining condition, and desired to have a beautiful smile. She expressed concerns about her trust level. Brad [Jones] provided me with the diagnostic wax-up with matrix, which is a blueprint preparation reduction guide. After forming the temporary, you hold it up to light to look for thin areas in the facials where you adjust the preparations accordingly. I used milky color Variolink Light (Ivoclar) during the cementation process. Afterward, I handed the patient the mirror and noted her reaction. Figure 5 (below) shows the prepared 1:2 photo of retracted view.
As the appointment arrived, our patient was a bit nervous, but she did well overall. The internal dark brown tetracycline stains turned darker as the preparation enters the dentin layer. After we finished the preparations, I made a set of provisionals using the clear matrix to check for thickness. They were too thin, and had show-through of the dark brown stains on the facials of teeth #6 to #11.
Because we wanted to be mindful of the patient’s wishes and prepare conservatively, we went back in our toolbox, and after preparing only on the facials of the prominent dark areas, we bonded Cosmedent Pink Opaque and then Cosmedent Renamel Microhybrid Composite shade A1 to mask (Cosmedent, Inc).
Pink is the opposite of gray, so this application helped us arrive at the desired stump shade, which allowed us to achieve our desired final shade. When we made her temporaries a second time, there was much less show-through, which indicated that the preparation was sufficient, especially knowing that Brad [Jones], the ceramist, applies an opaque internal filter to the IPS e.max (Ivoclar) restorations in these types of cases.
Shade selection was straightforward. Because the patient was having all upper 10 teeth restored, we did not have to match to her other teeth. We simply chose which shade was the best fit for her. Our patient is young, and she desired a lighter/brighter shade but authentic-looking restorations, so we mutually chose Vita B1. Also, our shade selection factored in that someday this patient would have her lower 10 teeth restored with porcelain veneers as well. Satisfied with our preparations and shade selection, we sent all the necessary materials to Brad Jones for the fabrication of the final porcelain restorations.
Figures 6-10 below: Nisha Krishnaiah, DDS
In order to predictably exceed patient’s expectations in today’s world, it is necessary to follow the smile design protocol. This starts out with preoperative records in the way of photography and full-arch impressions. Once the patient has been prepared, master impressions have been made, and the provisional has been placed and idealized, it is most important to record them with a full-face photo (patient must be standing for this photo) and an impression of the provisional.
This middle step, of providing a diagnostic wax-up and matrix to be used in the way of provisionals, is the first chance to get it right (Figure 11-12, below). Through the cast of the provisionals and a full-face photograph of the patient smiling in their provisional, we were able to assess and make any necessary corrections to the cast of the provisional. Tripod bites are used to record the patient’s preparation to opposing dentition so that the technician can replicate the actual bite relationship.
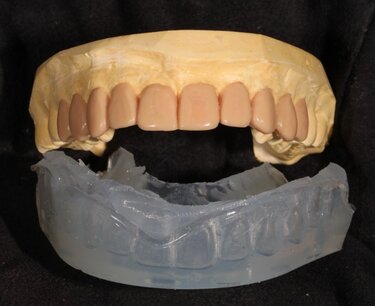
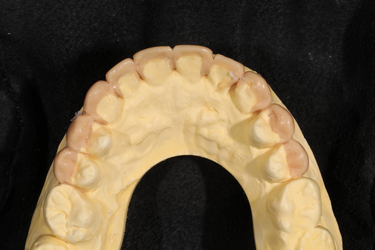
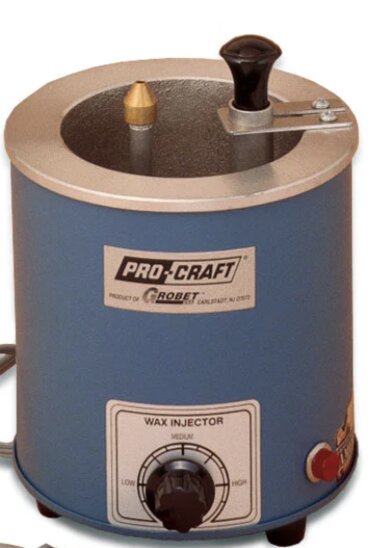
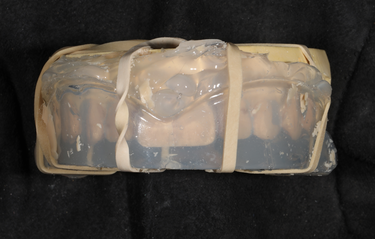
The core restorative units can be acquired in several different ways. I use a Pro-Craft wax injector from Grobet USA (Figure 13, below left), with beige wax (Yeti Dental) being injected through a clear matrix over the lubricated master dies (Figure 14, below right). This clear matrix is formed over the corrected cast of the provisional, giving us an exact copy, in wax, of the corrected cast of the provisional.
Through the process of the lost wax technique, we press IPS e.max lithium disilicate (Ivoclar)—in this case, MTB1. The MT signifies medium translucency, which is necessary for this case because of the underlying tooth discoloration.
This extreme case of tetracycline staining was controlled by a 3-prong technique. First, the clinician blocked out the facials for tooth #s 6 to 11 (Figures 6-7) with pink opaque composite. Second, by evaluating the 1:2 photos of the provisional (Figures 8-10), a medium translucent IPS e.max ingot (Ivoclar) was chosen for the restorative material. Last, it was evaluated and found necessary to place an internal opaque composite filter inside the veneers (Figures 21-22, below).
When this internal opaque filter technique is used, the ceramist is responsible for the composite interface with the veneer and they need to follow the manufacturer’s guidelines in its application. It is also necessary to inform the clinician not to etch the areas inside the veneers where this opaque filter is placed because it will etch away. I let the clinician know these restorations are ready for the luting dual-cure (DC) cement. In this case, all the restorations were cemented with light cure cement with the exception of teeth # 7 to #10.
In order to mimic the illuminating beauty of a natural anterior tooth, it is necessary to cut back and layer at least the restorations on teeth # 7 to #10 (Figure 15, right). A natural tooth not only reflects light but also absorbs light, especially in between the internal lobes and under the halo found on a natural anterior tooth’s incisal edge. The facial enamel in nature is approximately 0.5 mm in thickness and filters these internal effects, which lie underneath (Figure 20, see below).
Because the IPS e.max MT ingot has built-in vitality, it is not always necessary to fully cut back and layer the entire facial of the incisors. In this case, we cut back and layered about two-thirds of the facials. A guaranteed halo effect was created by undercutting and embossing an extremely thin incisal edge, and then high- and low-value stain was applied and fired in between where the mamelons will be placed (Figure 15).
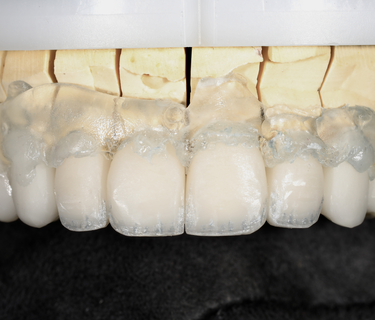
Opal Effect 1 (OE1) powder (Ivoclar) was color-tagged blue and added into the mesial and distal trough cutback (Figure 16). A 50-50 mixture of Mamelon Material (MM) light and Dentin A1 powder was color-tagged orange and placed in for the mesial and distal mamelons (Figure 17).
The middle mamelon was made up from MM salmon, color-tagged in pink, and a sliver of MM light powder, which shows up as white color. Then, Opal Effect 4 powder (Ivoclar) was applied as a high-filter band found in nature, which shows up in the midsection as white in color (Figures 16 - 17).
Lastly, the internal powder effects were finished off with an extremely thin line across the incisal edge, which shows up white in color and will strengthen the halo effect in mimicking the incisal edge of a natural incisor. The precise addition of the complete internal IPS e.max powder effects are shown in Figure 17. The fired internal effects are shown in Figure 18. Note the mamelons, halo, and high-value filter band found in a natural incisor tooth.
The mesial and distal cut and stained low-value troughs were again filled in to full contour with OE1 powder (Figure 19). The Transpa Incisal for B1 shade (TI1) powder, color-tagged fluorescent yellow, was filled in to full contour.
Final shapes and contours with surface morphology and perikymata were added to the restorations using diamond rotary instruments with an electric handpiece. The entire surface, both facial and lingual, was softened using a carborundum-impregnated knife-edge rubber wheel, then cleaned with soap and water and steam cleaned.
IPS e.max Non-Fluorescent Glaze paste (Ivoclar) was thinned out with glaze liquid and carefully applied to the restoration’s entire surface. After drying this applied glaze surface in front of the porcelain furnace’s muffle, the restorations were fired at 720 °C at the rate of 70° per minute.
Continuing to mimic a natural tooth, the artificial glazed surface was knocked down using the same carborundum-impregnated knife-edge rubber wheel. We then highlighted the polish in some areas using a felt wheel and diamond paste (Figure 20, above).
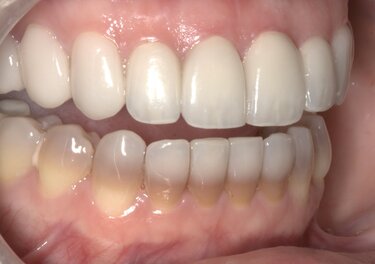
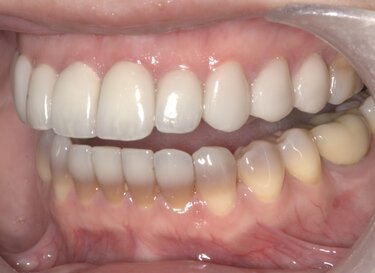
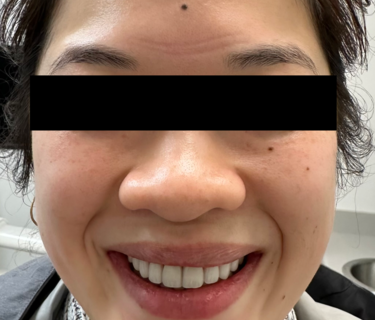
Even after having more than 25 years of clinical experience and working with a world class ceramist for the same period, we are always learning, Dr Krishnaiah states. This case had its challenges, but with an armamentarium of dental knowledge, tools, and techniques at hand, we overcame these challenges and delivered an outstanding end result. Our patient was extremely thrilled with the results. She could not stop smiling. The completed case is shown in Figures 23-24 (above), and the happy patient’s smile is shown in Figure 25 immediately after cementation.
Editor’s Note: The authors used a variety of products from several manufacturers to complete this case. Dr Krishnaiah wanted it noted that she used milky color Variolink Light (Ivoclar) during the cementation process. Afterward, she handed the patient the mirror and noted her reaction. Figure 5 shows the prepared 1:2 photo of retracted view.
Figure Captions:
Figure 1. Preoperative 1:10 image of full face.
Figure 2. Preoperative 1:2 image of smile.
Figure 3. Preoperative 1:2 image of right lateral smile.
Figure 4. Preoperative 1:2 image of retracted view.
Figure 5. Prepared 1:2 image of retracted view.
Figure 6. Pink Opaque composite.
Figure 7. Pink Opaque composite preparations.
Figure 8. Provisional 1:2 image of smile show-through.
Figure 9. Provisional right lateral smile (note show-through).
Figure 10. Provisional left lateral smile (note show-through).
Figure 11. Wax-up arch form.
Figure 12. Diagnostic wax-up.
Figure 13. Wax injector.
Figure 14. Injected wax into matrix formed from cast of provisional restorations..
Figure 15. Embossed halo with stain.
Figure 16. Layered effects over stain.
Figure 17. Complete effects.
Figure 18. Fired effects.
Figure 19. Enamel and opal layering over fired internal effects.
Figure 20. Glazed and polished IPS e.maxrestorations.
Figure 21. Etched, primed, and internally opaqued teeth ready for opaque composite.
Figure 22. IPS e.max incisors ready to seat.
Figure 23. Postoperative 1:2 image of retracted right lateral teeth.
Figure 24. Postoperative 1:2 image of retracted left lateral teeth.
Figure 25. Postoperative 1:10 image immediately after cementation.


DDS
Nisha Krishnaiah, DDS, is a skilled cosmetic and general dentist at Aesthetic Dentistry of Noe Valley in San Francisco, with over 20 years of experience. She is passionate about creating beautiful smiles and is a 15-year member of the American Academy of Cosmetic Dentistry. Dr. Krishnaiah stays at the forefront of her field by completing hundreds of hours of continuing education with top dental experts. Her personalized, holistic approach combines art and science for long-lasting cosmetic and functional results. She also offers Invisalign, restorative, general, and implant dentistry, and is a member of AACD, AAID, and SFDS.
FAACD
Brad Jones is a Fellow of the American Academy of Cosmetic Dentistry (AACD), one of only six ceramists worldwide to hold this honor. He served as an AACD accreditation examiner for six years and on the Board of Directors for four. As an international lecturer, accomplished author, and expert in advanced dental ceramics, particularly IPS e.MAX, Brad specializes in creating natural-looking smiles. His unique vision of light and color enables him to capture the inner life of a natural tooth, blending artistry and science to design smiles that retain each patient’s natural characteristics for a personalized result.
Receive our monthly newsletter on recently published blog articles, upcoming education programs and exciting new product campaigns!