Originally printed in Oral Health, September 2024
Written by Edward Lowe, BSc, DMD, AAACD
Designing a smile is often thought of as a concerted process by the dentist and the ceramist.1 The dentist is the designer and carries out the process of taking the patient and collecting data to determine the existing situation. Then using the tools available to them as a dentist, they begin to explore the options based on the diagnosis.
The role of the ceramist or dental technician is to take the blueprints given to them by the dentist and begin to make the planning of the case a reality. Decision making includes the current condition, how much room needed to make the restorations of choice, what material to make the restorations out of, and how to design the smile to fit the face of the owner using all that they know about dental anatomy, smile design, and occlusion.
Often overlooked is the role of the patient.2 What is their story? How does their input affect the outcome and decision making of the dentist and ceramist? As much as the dentist and ceramist appear to control the case, we must not forget the contribution of the patient. In the end, they walk away with the smile and own it, so in my opinion, I believe they have at least a third of the ownership in the final design of their smile.
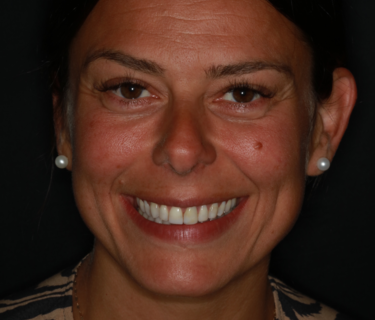
The journey for Enisa began with making an appointment to discuss her current smile. She is a 38-year-old entrepreneur, wife, and mother of 3 young children. Enisa is in good health and not taking any medications. Her personality type is cooperative and pleasant. (Fig. 1, left)
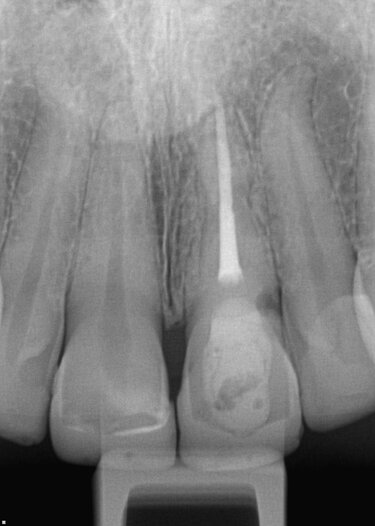
A volleyball accident at 12 caused her to fracture upper central incisors. Unfortunately, the impact led to subsequent root canal therapy on #2-1 in her teens. The broken centrals were initially restored with composite Class IV restorations and when she was in her early thirties, composite resin veneers were placed on her upper six anterior teeth #1-3 to #2-3. (Figs. 2 to 5, below)
Enisa’s chief dental concern was the constant chipping of the composite veneer restorations3 which required attention at unpredictable times. She did not like the shade of the anterior teeth and feels the midline looks odd with a black triangle above the contact between the central incisors. (Fig. 6, above)
She wants a nicely shaped smile which looks natural and brighter than her current one. This time around a more robust ceramic material will be used instead of composite resin to resurrect her smile.
-
mild gingivitis
-
minor recession on lower and upper premolars
-
pocket depths of 2-4mm
- high scallop
excellent bone support
-
generalized thick attached gingiva tissue
-
areas of minimal attachment in lower premolar areas
Biomechanical (Teeth)
-
Small occlusal amalgam fillings on upper left molars #2-6 and 2-7
-
Small composite fillings on premolars and molars #1-4, 1-5, 16-, 1-7, 2-4, 3-7, 4-5, 4-6, and 4-7
-
Ceramic crown on #3-6
-
No recurrent decay present
-
Root canal therapy #2-1 with lingual composite filling (Figs. 7, above and 8, below)
-
Class I molar and canine left and Class II molar and canine right
-
Max opening of 55mm
-
4mm OB and 4mm OJ
-
Ovoid arch with almost no crowding in both arches
-
Canine guidance and protrusive guidance on upper central and lower central and lateral incisors
-
No TMJ discomfort or noises
-
No tenderness in muscles of mastication upon palpation
-
Abfraction lesions #1-5 and 2-5
-
3mm incisal display in repose
-
Normal lip dynamics or smile line
-
11mm incisal display in a full smile
-
Tooth sizes of anterior teeth:
|
Tooth Number |
1-3 |
1-2 |
1-1 |
2-1 |
2-2 |
2-3 |
|
Length (mm) |
10 |
9 |
11 |
11.5 |
9 |
10.5 |
|
Width (mm) |
8 |
7 |
8.5 |
9.0 |
7 |
8 |
-
Gingival heights are not symmetrical and requires correction
-
Incisal edges of upper and lower anteriors are uneven and not symmetrical from an anterior view
-
Buccal corridor and gradation need correction on right side #1-4 to 1-6
-
Upper midline between central incisors equals facial midline; lower midline 3mm right of upper midline
-
Nasolabial angle of 105°
-
Normal philtrum
-
Maxilla slightly canted to the patient’s left
-
Left lip commissure in full smile higher than right
-
Incisal edges of upper central incisors just inside the wet-dry line in both the 12 o’clock and sagittal views
-
Central incisors tipped lingually in a sagittal view
-
Incisal/gingival and facial/lingual embrasures need balancing
-
Mesial inclination of long axis of upper lateral incisors needs correction
-
Gingival zeniths of #13 to #23 need correction
-
Orthodontics or no orthodontics and could we utilize Invisalign to align her teeth?
-
Alignment would improve her overbite and overjet relationship and reduce the stress on the anteriors during function.
-
Internally bleach #2-1 to match the core tooth structure to the adjacent teeth or not?
-
This eliminates the challenge of masking a tooth prep that is darker than its neighbor’s.
-
Do we correct the gingival height discrepancies and zeniths with a laser or not?
-
Doing so will enhance the final tissue arrangement over the new restorations
-
Internal Bleach endo treated #2-1
-
In Office Teeth Whitening
-
Gingival height recontouring #2-2 and gingival zeniths with soft tissue diode laser
-
Smile Design - Minimal and No Prep veneers4, 5, 6
-
#1-3, 1-4, 2-3, 2-4 prepless no reduction E.max lithium disilicate layered veneers
-
#1-1, 1-2, 2-1, 2-2 remove old composite and minimal prep e.max lithium disilicate layered veneers
-
Nightguard to protect the restorations from nocturnal bruxing
Enisa elected not to entertain the idea or orthodontic intervention in her new smile.
The process began by passing the treatment plan along with photos, videos, initial intraoral scans, radiographs, and digital smile design imaging to the ceramist Will Varda in this case. After a prep design, tooth shape, and proposed final shade discussion, the ceramist began to design the case in 3-Shape software so he could create a digital wax up or wax prototype. One of my major promises to Enisa was to avoid prepping any of her tooth structure in any way possible. It is too easy to remove tooth structure and spin down a tooth for a crown prep. Prepping a veneer requires so much more thought and planning. Deciding what to preserve and yet give the ceramist enough creative license and freedom to fabricate a beautiful restoration is not an easy process. This method of proactive thinking is the heart and soul of minimally invasive dentistry and the foundation of responsible esthetics.7, 8, 9, 10
Enisa had attractively shaped teeth, so the wax prototype was designed with this in mind. We tried not to make too many modifications to the shape of her teeth and simply added a bit of length and symmetry to enhance what Mother Nature conceived. (Fig. 9, below, left)
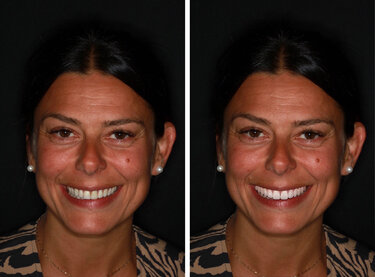
The SmileFy imaging (Fig.10, below, right) and wax prototype was shown to Enisa prior to her preparation appointment to include her in the decision-making process. With her approval, reduction guides and a putty matrix based on the wax prototype were fabricated by the lab and returned prior to the prep appointment.
We wanted to brighten tooth #2-1 and the lower teeth prior to the smile design prep day. The internal bleaching involved isolating #2-1 with a rubber dam and re-opening the original endodontic access opening by removing the lingual composite restoration and some of the gutta percha from the root canal filling down to the level of the CEJ (cementoenamel junction). The gutta percha was capped with a 2mm layer of glass ionomer cement to seal the canal orifice and eliminating the likelihood of invasive cervical root resorption. The pulp chamber was cleansed of any residual composite and etched with 35% phosphoric acid for 15 seconds and rinsed. Opalescence Endo (Ultradent), a 35% hydrogen peroxide gel, was introduced into the chamber. A small cotton pellet was placed, and the orifice was sealed with a drop of Vitrebond (3M) glass ionomer lining cement. We repeated this procedure 2 days later for a second session. With the internal shade of the changing from a prep shade of ND2 to an ND1, the cotton pellet was removed, and the access opening was restored with a B1 dentin shade of Empress Direct (Ivoclar).
On the day that we were to prepare the teeth for veneers, Enisa was given Citanest plain anesthetic with no epinephrine for the upper anterior teeth #1-3 to 2-3 where we were removing the old composite restorations.
#1-1 and #2-1 Preps:
-
Remove old composite with finishing burs and discs
-
Used to be a diastema between the teeth
-
Teeth had been prepped before
-
Break contacts to correct midline and take margin slightly sub gingivally on the mesial surfaces to close the diastema and allow for a more natural emergence profile.
-
About 1 mm facial reduction and 1 mm incisal reduction
-
Light chamfer finish line facial and 60° bevel for lingual margin
#1-2 and #22 Combo Preps:
-
Remove old composite from facial and mesial
-
Break mesial contact like a wrap prep
-
Maintain distal contact like a minimal prep veneer
-
About 1 mm facial reduction and 2 mm incisal reduction
-
Light chamfer finish line facial and 60° bevel for lingual margin
#1-3 and #1-4 Prepless:
-
Flatten excessive line angles and heights of contour
-
Round sharp incisal edges using a fine diamond or Soflex disk
-
Soften abfracture lesions
-
No margins or finish lines needed
The composites were carefully removed using fine diamonds and Soflex discs (3M). Heights of contour and gingival zeniths were fine-tuned with a soft tissue diode laser (Bluewave, Clinical Research Dental). The putty reduction guides were used often to ensure the minimal amount of tooth reduction was accomplished to fit the criteria for adequate room designated by the ceramist.
The teeth preparations were polished (Fig. 11, below), and a single long #000 retraction cord (Knit-PAK, Premier) was placed from #1-4 to #2-4 with a composite IPC carver that is not too thin for packing cord. I typically use a #000 cord and sometimes a #00 or #0 as a second cord if needed. For veneers, I often pack one long cord in the tooth margin/sulcus of all the teeth involved. (Fig. 12, below)
Impressions were taken both using a heavy body/light body PVS material (Virtual, Ivoclar) and an intra-oral scanner (VivaScan, Ivoclar). Two scans and two impressions were taken. One set of scans/impressions was taken before the cord was placed and one set after. This allows the ceramist to have a better view at adapting the prepless veneers’ final margin position on the die.
Preparation shade photos were taken using the Polar_Eyes polarizing filter on the ring flash of the Canon 5DSR digital SLR camera. The polarizer eliminates the glare associated with ring or dual point flashes and gives more detail about the shade and subtleties of the teeth. (Fig. 13, above)
Provisional restorations were made using a lock-on technique and self-cure acrylic resin (Luxatemp Ultra, DMG America). The mouth was isolated with a self-retracting retractor and tooth preparations were spot etched with 35% phosphoric acid gel. The teeth were rinsed after 15 seconds and dried. (Fig. 14, above)
A coating of Cervitec Plus (Ivoclar) was painted on the teeth and lightly air dried. Chlorhexidine and thymol are the antimicrobial components in Cervitec Plus varnish. (Fig. 15, below) They protect the tooth surface by reducing bacterial activity under the provisionals and decreasing sensitivity. The prefabricated putty matrix of the wax prototype from the lab was loaded with Luxatemp from #1-4 to 2-4. (Fig. 16, below) The loaded putty matrix was then immediately placed into the mouth and held in place with firm occlusal pressure. After 2 minutes, the putty matrix was gently removed to reveal the provisionals in place. Excess flash was removed with hand instruments and finishing carbides. (Fig. 17, below) The provisionals were shaped and polished with Soflex discs (3M) and Jiffy composite polishing brushes (Ultradent). The final touch was adding a coating of Luxaglaze (DMG America) to seal the surface of the provisionals and prevent them from picking up stain. After checking the occlusion, the Enisa was dismissed with home care instructions for maintaining the gingival health around the provisionals. (Figs. 18 and 19, below)
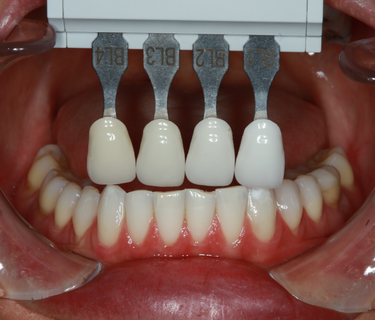
The next step was to bleach Enisa’s remaining teeth that were not involved with the veneer case externally with an in-office teeth whitening treatment (GLO, Glo Science). We were able to brighten her teeth from an initial shade of BL4 to a BL2. After letting the teeth relax for a few days she was stable with a lower teeth shade of BL2/3. (Fig. 20, left top)
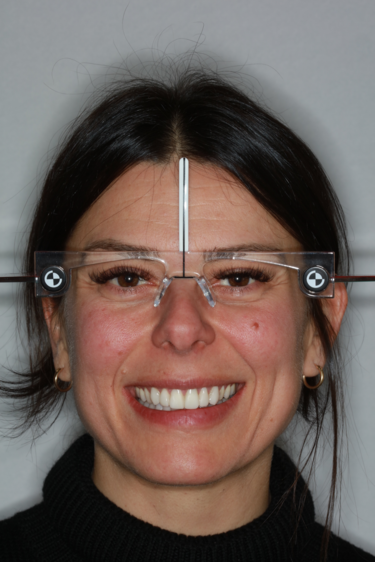
A week later, adjustments to the shape, size, occlusion and colour of the provisionals was carried out. Once the provisionals were approved by the patient, we took a photo of the retracted provisional smile with the teeth apart. The patient was wearing Kois facial reference glasses to capture her dentofacial esthetic data for the lab. (Fig. 21, left bottom)
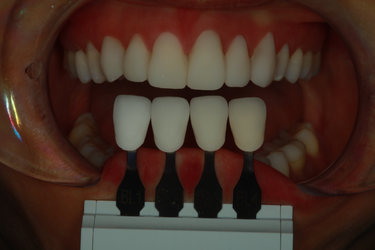
After getting the basic shade using the SmileLite (Smileline, USA), final shade selection was made with Chromoscop (Ivoclar) shade tabs shot with the Polar_Eyes filter. (Fig. 22, left bottom)
Always Look at the lower anteriors for shade, characteristics, and incisal translucency clues. You can get away with the upper teeth being a bit lighter than the lowers. These restorations will be thin, so a higher value restorative material can work here. The colour of the prep should come through and if needed, colored resin cement will shift the shade of a thin veneer at the seat appointment.
An intraoral scan of the approved provisionals was sent to the lab along with this description:
-
-
-
Name of Patient: Enisa H
-
Age: 38
-
Gender: Female
-
Materials: E.max Lithium Disilicate Layered
-
Teeth to be restored: 1-1, 1-2, 1-3, 1-4, 2-1, 2-2, 2-3, 2-4
-
Length of Centrals: 11.5 mm as per her natural original length on wax up. Copy length of provisional model
-
Shade: BL3 gingival BL2 body as discussed. Note maverick colours, hypocalcification areas, and craze lines using lower anterior teeth photos as a guide.
-
Shade of Preparations: ND1 for all teeth
-
Incisal Translucency: 1mm moderate amount following pattern on lower incisors
-
Shade of Translucency: see photo of lower incisors
-
Surface Finish: Polished Satin finish NOT High Glaze
-
Surface Texture: Medium with light perikymata and follow lower anteriors
-
-
E.max lithium disilicate was selected as the ceramic for this case because it is robust and has strength, beauty, and a great track record of long-term success. The veneers will be layered with effect porcelain rather than surface stained. This gives the veneers inner beauty and colour fastness that will not wear easily for many years.
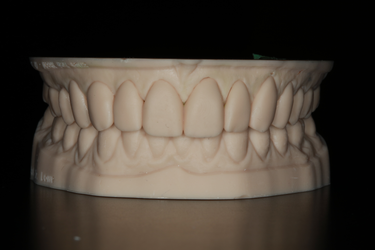
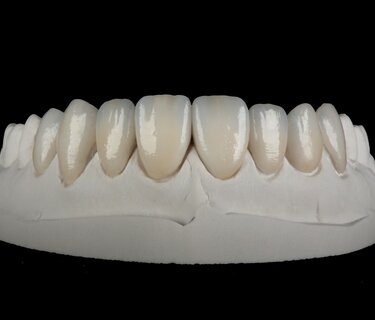
Upon return of the finished case, an inspection was made of the restorations on the model. (Fig. 23, below full) They were checked for fit, shade, and marginal integrity. Once dentist, ceramist, and patient all agreed that the case was acceptable, the patient was anaesthetized, and the provisional restorations were removed with a hemostat. The teeth were cleaned with a mixture of flour of pumice and chlorhexidine rinse. The eight E.max lithium disilicate veneers were tried in:
- One at a time dry to check fit and margins
- Two by two and then all at once dry, to check contacts. Tight contacts were checked with articulating paper, adjusted with fine diamond burs, and repolished with a porcelain polisher
- All at once with Variolink Esthetic (Ivoclar) try in paste (neutral on the left side and warm on the right) (Fig. 24, below left)
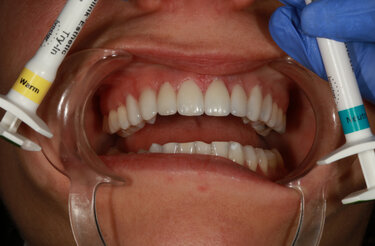
Neutral was selected as the cement shade and the restorations were removed and prepared for cementation. The try-in gel was rinsed off and the intaglio surface of the veneers were treated with Ivoclean (Ivoclar) to remove salivary proteins and rinsed. A thin layer of Monobond Plus (Ivoclar) was painted on the intaglio surface of the veneers and left for 1 minute before air drying. The veneers were set aside as a slit rubber dam was placed in the mouth. #12A and #13A rubber dam retainers were placed on the upper first molars. The slit rubber dam was place over the first molars and a rubber dam frame was placed. Vanilla Bite (DenMat) bite registration material was used to seal the palate area of the rubber dam.
All the prepped teeth were etched with 35% phosphoric acid gel for 15 seconds (enamel) and 10 seconds (dentin). The etch was rinsed off and the preps were left moist. Adhese Universal (Ivoclar) was place on the etched preps and agitated with brush at the end of the VivaPen. After 20 seconds, the solvent was evaporated with a warm air tooth dryer (Adec) and each prep was cured for 5 seconds with the Bluephase Powercure light (Ivoclar).
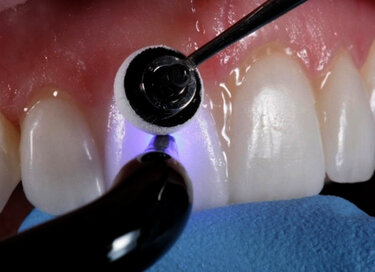
Variolink Esthetic LC resin cement (Ivoclar) was dispensed onto the intaglio surface of #1-1, 1-2, 2-1 and 2-2 veneers and placed on the teeth. Using a 6mm Optrasculpt pad (Ivoclar) to manipulate the veneers from the facial aspect and light pressure from a gloved finger from the incisal aspect, the veneers were seated. Using a 2mm tacking tip on the curing light placed in the center of its facial surface, the veneer #1-1 is tacked for 1 second. (Fig. 25, above right) This was repeated on the adjacent veneer #21 as well as #12 and 2-2. Excess cement was removed with a brush and the sequence was repeated, starting with #1-3 and 1-4 and then #2-3 and 2-4.
With all the excess cement removed and all 8 veneers tacked on, floss with a thin floss like Glide (Oral B) between each contact twice and then pull the floss through the lingual and out. Liquid Strip (Ivoclar) was dispensed around all the margins of the veneers. The glycerin was to ensure the oxygen inhibited layer was cured thoroughly. The veneers were then cured for 5 seconds from the facial and 5 seconds from the lingual with the PowerCure light.
Excess Liquid Strip was washed away, and excess cement was removed with a scaler. Using a 32-blade finishing carbide, residual cement was removed from the margins. A pencil was rubbed over the facial surface of the veneers to mark and check for cement residue and any found was removed with a Bard Parker #15 scalpel blade. On the lingual surface of the veneers, a 32 blade football carbide was used to remove residual cement. The veneers were flossed again and a piece of coral Epitex strip (GC America) was used to polish interproximally.
The occlusion was checked in MIP and in all excursive movements with articulation paper and any adjustment were made with a fine football finishing diamond. All adjusted surfaces were buffed with Optragloss finishers and polishers (Ivoclar). (Figs. 26 to 31, below)

Enisa loved her new E.max lithium dislicate veneers and so did the ceramist and me. This was the culmination of a collaboration of minds to working together to arrive at a successful outcome. (Fig. 32, left)
In conclusion, it takes a team effort and organization to be successful when designing a smile.11 The patient plays a pivotal role in their own journey and must be made a part of the planning process. Remember there is a person and personality behind that set of teeth and each one is unique and special.
If you tick off everything on the patient’s wish list, you have a satisfied client. As you and your ceramist move onto a new journey with another case, it is their new smile that continues being the ambassador for your business and reputation as a smile design team.

BSc, DMD, AAACD
Dr. Edward Lowe, a leading expert in cosmetic dentistry, founded The Lowe Centre for Cosmetic and Implant Dentistry in Vancouver. With a career spanning decades, Dr. Lowe is renowned for his contributions to dental education, product development, and editorial work in prestigious dental journals. He is a sought-after international lecturer and an accredited member and examiner of the American Academy of Cosmetic Dentistry. Dr. Lowe combines advanced aesthetic techniques with a personalized approach to help patients achieve their ideal smiles.
Receive our monthly newsletter on recently published blog articles, upcoming education programs and exciting new product campaigns!
References
-
Ismail EH, Al-Moghrabi D. Interrelationship between dental clinicians and laboratory technicians: a qualitative study. BMC Oral Health. 2023 Sep 20;23(1):682. doi: 10.1186/s12903-023-03395-z. PMID: 37730593; PMCID: PMC10512600.
-
Böhme Kristensen C, Asimakopoulou K, Scambler S. Enhancing patient-centred care in dentistry: a narrative review. Br Med Bull. 2023 Dec 11;148(1):79-88. doi: 10.1093/bmb/ldad026. PMID: 37838360; PMCID: PMC10724466.
-
Shah YR, Shiraguppi VL, Deosarkar BA, Shelke UR. Long-term survival and reasons for failure in direct anterior composite restorations: A systematic review. J Conserv Dent. 2021 Sep-Oct;24(5):415-420. doi: 10.4103/jcd.jcd_527_21. Epub 2022 Mar 7. PMID: 35399771; PMCID: PMC8989165.
-
Strassler H. E. Minimally invasive porcelain veneers: indications for a conservative esthetic dentistry treatment modality. General Dentistry. 2007;55(7):686–694. [PubMed] [Google Scholar]
-
LeSage B. Establishing a classification system and criteria for veneer preparations. Compendium of Continuing Education in Dentistry. 2013;34(2):104–117. [PubMed] [Google Scholar]
-
Zarone F, leone r, Di Mauro Mi, Ferrari M, sorrentino r. No-preparation ceramic veneers: a systematic review. J Osseointegr 2018;10(1):17-22. DOi 10.23805 /JO.2018.10.01.01
-
LeSage B. Revisiting the design of minimal and no-preparation veneers: a step-by-step technique. Journal of the California Dental Association. 2010;38(8):561–569. [PubMed] [Google Scholar]
-
Vanlıoğlu B. A., Kulak-Özkan Y. Minimally invasive veneers: current state of the art. Clinical, Cosmetic and Investigational Dentistry. 2014;6:101–107. doi: 10.2147/ccide.s53209. [PMC free article] [PubMed] [CrossRef] [Google Scholar]
-
Javaheri D. Considerations for planning esthetic treatment with 261 veneers involving no or minimal preparation. J Am Dent Assoc 2007; 262 138(3):331–337.
-
D'Arcangelo C, Vadini M, D'Amario M, Chiavaroli Z, De Angelis F. Protocol for a new concept of no-prep ultrathin ceramic veneers. J Esthet Restor Dent. 2018 May;30(3):173-179. doi: https://doi.org/10.1111/jerd.12351
-
Pincus C. R. Building mouth personality. Journal of the California Dental Association. 1938;14:125–129.[Google Scholar]