Gunther Seubert, MDT
Dental restorations are often referred to as tooth replacements. However, this definition does not do them justice. The materials and techniques we have at our disposal today allow us to craft dental restorations that are true-to-life replicas of natural teeth. Therefore, we actually have the ability to restore teeth according to individual requirements. Nature provides us with the example; all we have to do is to understand nature.
A lifelike dental restoration is characterized by three key elements: form, function and esthetics. A perfect balance of these elements needs to be achieved for a restoration to look natural. This is a complex task. The restoration has to function properly and it should be comfortable. The fit has to be just right, and so does the bond between the restoration and the remaining tooth structure or a customized abutment. Furthermore, a ceramic restorative material should look like natural dental enamel under all light conditions. The patient’s individuality needs to be taken into account, including a host of other aspects. From among all the different options available, dental technicians have to choose those that will most benefit them in accomplishing a specific job. Their knowledge of dental materials and fabrication methods including their personal preferences will dictate the decision-making process. This is by no means a competition between digital and conventional approaches.
The material of choice
My extensive knowledge of dental materials allows me to choose my preferred ceramic restorative with ease: The lithium disilicate of the IPS e.max product range closely mimics the characteristics of natural dental enamel in terms of flexural strength and hardness. For example, the biaxial flexural strength of restorations made with the IPS e.max CAD ingots has been shown to measure 530 MPa over a period of more than 10 years; IPS e.max Press exhibits 470 MPa. Various long-term studies confirm the material’s impressive durability: Failures as a result of fracture or chipping can be almost entirely excluded if the material is properly used. Furthermore, it shows ideal wear properties, and it is gentle to opposing teeth. Excellent optical properties that are modelled on those of natural teeth are responsible for achieving reliable esthetic outcomes and excellent colour results. The microstructure of IPS e.max Press consists of approx. 70% lithium disilicate crystals, which are embedded in a glass matrix. The main lithium disilicate crystal phase is composed of needle-like crystals measuring 3 to 6 μm in length. Lithium disilicate is characterized by its special appearance which is neither too transparent nor too opaque. If the appropriate basic colour is chosen, the chameleon effect will come into its own.

To press or mill, that is the question
Both the press and CAD/CAM techniques have specific benefits to offer. For several different reasons I personally prefer the press technique. One of the main reasons is that I have many years of experience in using the conventional pressing method and I have had many successes with it. I appreciate the fact that I can do my work without having to take into consideration any loss of dimension when I am creating the restoration: what you make is what you get. I can determine the details of the restoration and its accuracy of fit right at the beginning when I am producing the wax-up. When I design a restoration on the computer, I am able to plan the fine details. However, due to process-related reasons, the milling machine cannot reproduce them with absolute accuracy. The problem involves what is called cutter radius compensation. Ultimately, the restoration still has to be finished manually. The press technique shows a clear advantage when it comes to creating sharp-edged and intricately-designed restorations. Machines are limited in what they can achieve by the diameter of their finest tools.
My method for producing natural-looking restorations


This progression is very even. The way in which the wax-up is sprued determines how the dentin and enamel areas are distributed within the restoration. This saves the technician from having to characterize the restoration over and over again. Before the wax-up is invested, its position is checked with a calliper gauge. The preheating furnace should be switched on at this stage, so that it can heat up to the required temperature while the investment and hardening process takes place.
Once the wax-up is completely covered with the investment material (in this case IPS PressVest Premium, Ivoclar Vivadent), the compactor is turned off – in order to prevent any air bubbles from rising – and the remainder of the investment ring is filled. Then the cover is carefully placed on the investment ring. The setting time of the investment material has to be closely monitored. When the material is hard, the investment ring is placed in the preheating oven, even if it has not yet attained the selected final temperature. This leaves enough time to prepare the press furnace (in this case Programat EP5010, Ivoclar Vivadent) together with the required materials.


Therefore, the very thin reaction layer that forms on IPS e.max Press Multi must be removed. For this purpose, the blasted object is placed in a plastic container and completely covered with IPS e.max Press Invex (Investment-Ex) Liquid. The container is closed and placed in an ultrasonic cleaner for 10 to 30 min. Next, the pressing is removed from the container and rinsed under running water. A white film will now be visible on the object. This is the reaction layer. It is removed by blasting the pressing with 50 µm aluminium oxide at 2 bar pressure to create a smooth surface. A suitable cutting disc is used to remove the press sprue. Then, the crown is carefully placed on the die, without applying any pressure. The proximal and occlusal contacts are examined in the articulator and the free-way space of the simulated masticatory movements are checked and adjusted. Finally, the crown is finished with suitable diamonds, carbide burs and silicone polishers. Depending on the condition of the remaining dentition, polishing may be all that is necessary.


Conclusion
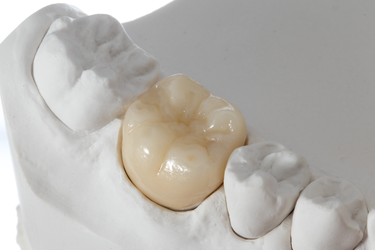
The accuracy of fit achieved with this conventional manufacturing method is unsurpassed: The all-ceramic restoration is reproduced from the wax-up with utmost accuracy. This technique fulfils the requirements of esthetics, form and function in every respect. The properties of the all-ceramic correspond to those of the natural tooth structure in terms of appearance and wear behaviour. Moreover, the press technique is highly economical. It incurs low material and equipment costs and involves minimal initial outlay. In addition, its maintenance, update and support costs are almost negligible. The benefits are entirely reaped by the dental laboratory.

Receive our monthly newsletter on recently published blog articles, upcoming education programs and exciting new product campaigns!