Abstract
Closing a midline diastema without addressing key smile components—such as tooth color, shape, size, gum line, and alignment—can result in restorations that look out of place and disproportionate to the surrounding teeth. A more holistic, interdisciplinary approach using digital planning is essential for achieving optimal results. This method not only visualizes both orthodontic and aesthetic changes but also enhances patient understanding and sets the stage for precise treatment execution with proven restorative materials. This article outlines a fully digital, interdisciplinary workflow that begins with facially driven ortho-restorative treatment planning. It ensures predictable results by using clear aligners to position teeth according to a prosthetic plan, culminating in the placement of four minimally invasive lithium disilicate veneers.
Introduction
Minimally invasive dentistry focuses on the dentist's ability to perform the most conservative procedures while meeting the unique needs of each patient. In some cases, this may involve addressing only the teeth the patient feels are causing aesthetic concerns. However, without a thorough evaluation, accurate diagnosis, and thoughtful treatment planning, simply providing what the patient asks for can lead to undesirable functional or aesthetic outcomes.
For example, patients may request direct composite restorations to close a diastema between their maxillary central incisors. Without consideration of tooth position within the arch, occlusion, wear patterns and tooth size proportions, the restorations could ultimately appear disproportioned compared to the adjacent teeth once the space is filled.1,2 Similarly, without proper tooth positioning and alignment to accommodate the placement of multiple crowns or veneers, endeavors to make the restorations “look right” may require excessive tooth structure removal to prevent overcontroured restorations.3
Instead, a more interdisciplinary approach can be undertaken to address patient requests in the context of a comprehensive examination that evaluates all components of the smile, including tooth color, size and shape; gingival display; and tooth position within the arch.2 Diastema closure, in particular, requires this type of detailed examination to determine whether fixed or removable orthodontics, direct or indirect restorations, and/or minimal or more aggressive tooth preparations are appropriate.1,3,4 Fortunately, digital smile design software enables more than just planning the execution of treatments, but rather provides a means to visualize clinical and esthetic changes and leverage that visualization for patient communication, understanding, and ultimately case acceptance.5
In fact, it is now possible to utilize a complete digital assessment and planning workflow to analyze, stage the orthodontic treatment, and subsequently design restorations for restorative cases, including those for midline diastema closure.6,7 Such an interdisciplinary approach—one based on pre-restorative orthodontic alignment that moves the teeth into the center of their proposed position on the digital wax-up—can help to optimize esthetic and functional treatment outcomes.6 In cases with a bolton discrepancy where the maxillary tooth mass is insufficient for the arch size, a digitally developed treatment plan could then enable redistribution of the midline diastema by evenly distributing space among maxillary anterior teeth in order to accommodate ideally proportioned, minimally invasive veneer restorations.
The following presentation describes a case for which pre-restorative clear aligner orthodontics (e.g., Invisalign, Align Technologies) were planned using digital planning software, Invisalign Smile Architect, and treatment was executed in order to enable placement of four well-proportioned minimally invasive lithium disilicate veneers (IPS e.max, Ivoclar Vivadent, Amherst, NY). Staging the treatment in this manner enabled maintenance of healthy gingival tissues, prevented unnecessary over-contouring, and ensured an overall esthetic outcome.
Figure 1 (below). Preoperative full-facial view illustrating the patient’s large midline diastema.

Case Presentation
A 38-year-old male patient presented with a chief complaint about the large gap between his maxillary central incisors (i.e., teeth numbers 8 and 9). A man of few words, his only treatment request was to “fill” the diastema between these teeth as quickly and cost-effectively as possible (Figures 1 and 2).
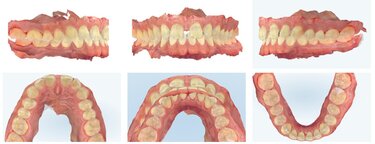
Comprehensive intraoral, photographic, and radiographic examinations were performed (Figure 3). The patient presented with healthy periodontium, Stage 1, Grade A, according to the 2017 American Academy of Periodontology classification.
Figure 2-3 (below).
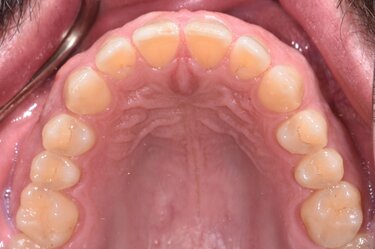
Intraoral scans were also taken of the patient’s bite in maximum intercuspal position (MIP), in addition to occlusal views, and analyzed to properly evaluate and diagnose the patient’s condition (Figure 4). It was determined that the patient demonstrated a Class 1 malocclusion, a deep bite (60% overbite) and a 4 mm overjet. Several other problems were noted including a Bolton Discrepancy, as evidenced by a large midline diastema, no mandibular spacing, and small maxillary anterior teeth. There was also evidence of narrow buccal corridors and worn maxillary and mandibular anterior teeth as a result of parafunction (i.e., grinding, bruxing) in a crossover wear pattern.
Figure 4 (below). Intraoral scans were taken of the patient’s bite in maximum intercusal position (MIP), in additional to occlusal views of the maxillary and mandibular arches.
Based on these findings, it was clear that the patient’s requested treatment of “filling” the midline diastema would result in a poor esthetic outcome and functional challenges. In particular, if the maxillary central incisors were restored without first repositioning them orthodontically, the result would be central incisors that appear too wide, and his tooth and gingival health would be compromised due to over-contoured restorations. Additionally, the patient’s ongoing bruxing—which produced a crossover wear pattern—would continue to wear his teeth in the same path and/or contribute to future restoration failure.
Collaborative Esthetic Problem Identification
To better visualize that only restoring the two front teeth to close the gap—without repositioning the teeth—would result in disproportionately large central incisors, a digital rendering is shown in Figure 5. The initial malocclusion shown in the Invisalign Clincheck software can be viewed in the full face photo in Invisalign Smile Architect to start the facially driven pre-restorative orthodontic treatment planning process (Figure 6).
Figures 5-6 (below).
The initial treatment recommendation involved orthodontics to idealize tooth spacing and optimize his occlusion, then restore between 4 to 6 maxillary anterior teeth (i.e., teeth numbers 6 through 11) with lithium disilicate veneers (IPS e.max, Ivoclar Vivadent, Amherst, NY). Clear aligner orthodontics (e.g., Invisalign) would reposition the anterior teeth, even out the spacing between the teeth—rather than leaving a large midline diastema, and place the teeth in the center of the planned restorations. This would enable minimally invasive preparations by using tooth reduction through an intraoral a mock-up of the proposed smile design. The selected lithium disilicate veneers, based on published research, would provide durable and functional esthetics in this highly visible esthetic zone.8-11
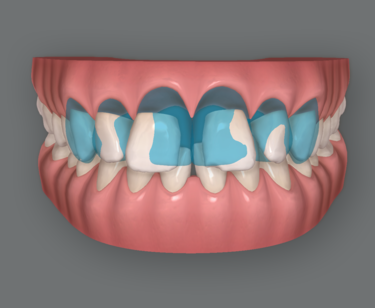
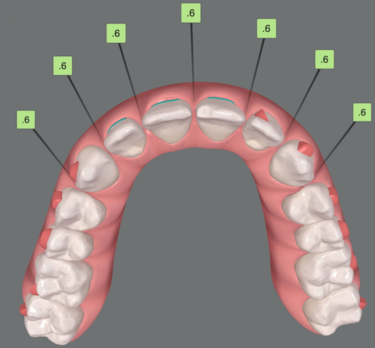
To emphasize the importance of achieving the ideal tooth position and spacing first, the treatment planning and smile design software was used to demonstrate the proposed final prosthetic positions (Figure 7). It is clear in this view that to achieve more ideal esthetics without orthodontic treatment, aggressive preparations that would be necessary if the restorations were placed on the teeth in their current locations. The digital smile design software was then used to illustrate how the smile could appear if restorations were placed on teeth numbers 6 through 11 after the teeth were moved into their orthodontically corrected position (Figures 8 and 9). These positions would reflect evenly distributed spacing among the maxillary teeth and contribute to idealized esthetics, function, and preservation of natural tooth structure (Figure 10).
Figure 7(below). Without orthodontic treatment, all of the white tooth structure beyond the blue restorative design would have to be prepared/reduced to create an aligned tooth appearance.
Figure 8 (below). The smile design software illustrated the potential restoration of teeth numbers 6 through 11, with the proposed final orthodontically corrected tooth position within the restorations’ outlines; the teeth would be orthodontically aligned prior to initiating restorative treatment.
Figure 9 (below). The smile design software showed the proposed final tooth position.
Figure 10 (below). The final treatment-planned tooth position would evenly distribute spacing among the maxillary teeth, as illustrated in the occlusal view of the orthodontic planning software (e.g., ClinCheck).
Treatment Plan Acceptance
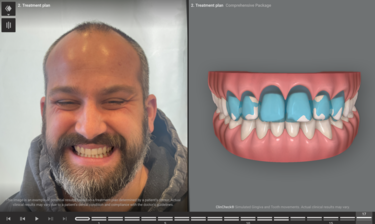
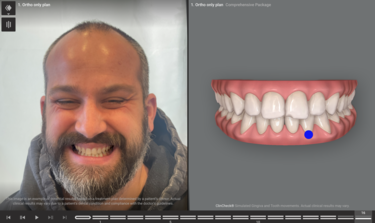
Based on the collaborative review of the patient’s esthetic and functional issues that would affect the predictability of his ultimately desired outcome (i.e., closing the midline diastema) (Figures 11 through 13), he agreed to undergo clear aligner orthodontics, followed by conservative, minimally invasive restoration of teeth numbers 7 through 10 with lithium disilicate (e.g., IPS e.max) veneers.13 He agreed to restoration of these four teeth as a starting point; the canines could be restored in the future if the patient wishes.
Figures 11-13 (below).
The orthodontic tooth movement and initial restoration/smile design were treatment planned digitally (e.g., Invisalign Smile Architect) in a coordinated, interdisciplinary manner. This helped to ensure that the final corrected tooth position would fall in the center of the pre-planned restorations (i.e., prosthetic design). The lithium disilicate veneers for teeth numbers 7 through 10 would correct color, chipping, wear, and spacing issues among the maxillary anterior teeth for improved esthetics and function.
Additionally, direct composite restorations would be placed on his lower anterior teeth to correct wear/chipping and keep his treatment costs more manageable.
Treatment Progression
The patient underwent 16 weeks of clear aligner orthodontics to pre-restoratively position his maxillary anterior teeth in their ideal position (Figures 14 though 16).
Figures 14 though 16 (below).
Sixteen aligners were used during the four-month period, which successfully distributed space evenly among the anterior teeth as predicted in the initial orthodontic plan (Figure 17).
Figure 17 (below). Post-orthodontic maxillary arch occlusal view confirming the evenly distributed spacing among the anterior teeth.
To address the discolouration observed in the anterior teeth (Figure 18), in-office tooth whitening was performed three weeks prior to the preparation appointment for the veneer restorations. Several studies have demonstrated a reduction in bond strengths when adhesive procedures are performed immediately and/or too soon after tooth bleaching.14,15 Therefore, restorative procedures were delayed to allow for any shade rebound or shift, as well as ensure proper adhesive bond strengths for veneer placement (Figure 19). An analysis of the whitening results (Figure 20) further emphasized the need for a direct composite restoration on the incisal edge of tooth number 25 and enameloplasty of the lower anteriors in order to level out and smooth the mandibular incisal edges for both improved aesthetics and function.
Figures 18-20 (below).
Restoration Design, Shade Taking & Provisionalization
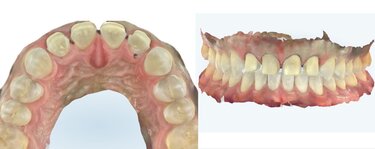
Various photographic and digital records were shared with the laboratory to fully communicate the patient’s pre- and post-orthodontic tooth positions and alignment (Figure 21), as well as convey what final results were anticipated in the pre-orthodontic restorative planning (Figure 22). The laboratory then digitally designed an initial wax-up of the final veneer restorations (Figure 23), which served as a blueprint for creating an intraoral mockup and preparation guide to ensure minimally invasive tooth reduction.
Figures 21-23 (below).
At the preparation appointment, four veneer preparations were completed, with care taken to break through the contacts and end the preparation margins lingual to the contact areas. This was essential in order to allow the restorative design to close the interproximal spaces, without creating overcontoured restorations. Subsequently, size 000 retraction cords were placed, and digital impression scans were taken (Figure 24).
Figure 24 (below). Scans were taken of the completed preparations. Note that contacts were broken to enable space closure in the restoration design.
The stump shades of the preparations were determined using a dentin shade guide (Ivoclar Vivadent) and photographed for communication with the laboratory (Figure 25). However, because spectral reflections caused by saliva or the roughness of the preparation surface can affect the accuracy of shade assessments,16 a polarized photograph was also taken of the dentin shade guide next to the preparations (Figure 26). This would enable distortion-free stump shade determination.16
Figures 25 and 26 (below).
The provisional restorations for teeth numbers 7 through 10 were then placed, after which shades of the natural canines were taken using a Vita shade guide (Figure 27). Although the canines were found to approximate shade A2 and get gradually lighter toward the incisal edge, the veneer restorations on teeth numbers 7 through 10 would ideally be slightly brighter since canines are naturally yellower than anterior teeth due to thickness of enamel and dentin, and position in the arch. Photographs of the provisional restorations were taken from multiple perspectives (Figure 28), and intraoral scans were also taken to document and communicate the patient’s enhanced tooth position and alignment (Figure 29).
Figures 27-29 (below).
Final Restoration Delivery
Four lithium dislocate restorations were fabricated from an esthetic, medium translucency ingot in shade BL3 (IPS e.max, Ivoclar Vivadent). This would allow the restorations to demonstrate the desired brightness with some translucency, while still accommodating a cut-back and layering technique for ideal esthetics.
At the delivery appointment, the provisional restorations were removed; the preparations cleaned and dried; and the final restorations tried in. The patient was given time to determine if the restorations met his expectations. After securing his approval, the cementation process began.
The veneers were previously lab etched with hydrofluoric acid. The restorations were removed, cleaned with Ivoclean, rinsed and dried. The bonding surfaces of the veneers were then primed by applying the bonding agent (e.g., Monobond Plus, Ivoclar Vivadent) with a brush, allowing it to react for 60 seconds, and then dispersing it with a stream of oil free air.
Next, proper intraoral isolation was established, and the tooth preparations were etched with 37% phosphoric acid for 30 seconds, thoroughly rinsed, and then air dried. A universal adhesive bonding agent (e.g., Adhese Universal, Ivoclar Vivadent) was applied and scrubbed onto the preparation surfaces for 20 seconds each, after which it was air dried to a glossy appearance and light-cured for 10 seconds per preparation.
Immediately before seating the veneers, the chosen esthetic light-cured cement (e.g., Variolink Esthetic LC, Ivoclar Vivadent) was dispensed from the syringe and applied to the internal surface of each restoration, after which it was placed onto the preparation. Excess cement was allowed to extrude from the margins, and the veneer was tack cured into place using a tack tip; the hardened excess was then easily removed. To prevent the oxygen inhibition layer, veneer margins were covered with glycerine gel/Airblock (e.g., Liquid Strip) immediately after excess cement removal.
Once all four veneers were tacked into place, each restoration was cured for 40 seconds per surface using the regular light curing tip. To ensure a successful long-term outcome (Figures 30 and 31), all margins were examined for excess cement removal and confirmed with interproximal flossing, and a final check of the patient’s alignment and occlusion was performed (Figure 32).
Figures 30-32 (below).
Additionally, his restored smile contributed to a look in his eyes and his overall facial appearance that radiated a new-found confidence, energy, and zest for life (Figure 35). To maintain his restorative and orthodontic treatment, the patient would require nighttime protection and retention to prevent relapse.
Figure 35 (below). Final full-facial view showing the patient’s wide smile.

Conclusion
When patients fully understand the rationale behind treatment recommendations, most are willing to invest in their long-term health and well-being, especially when the benefits are clear. In the case presented, the patient initially sought a quick, cost-effective solution but ultimately embraced a more comprehensive treatment plan after recognizing the lasting value of preserving his natural teeth. This successful aesthetic and functional outcome was made possible by a combination of pre-restorative orthodontic planning, a seamless digital workflow, precise shade selection, and the use of the highly aesthetic and durable IPS e.max material. By harnessing the power of digital treatment planning and visualization, ortho-restorative procedures become more predictable, enhancing both the clinical outcomes and communication between the doctor and laboratory.
*The author extends special thanks to The Aurum Group for their exceptional laboratory work on this case.

Receive our monthly newsletter on recently published blog articles, upcoming education programs and exciting new product campaigns!
References
1. Chu CH, Zhang CF, Jin LJ. Treating a maxillary midline diastema in adult patients: a general dentist's perspective. J Am Dent Assoc. 2011 Nov;142(11):1258-64.
2. Gomes GH, Corbellini AO, Rotta WG, Martos J, Boeira GF. Interdisciplinary esthetic approach in clinical dental rehabilitation. J Conserv Dent. 2021 Sep-Oct;24(5):519-523.
3. Valente MSO, Neto CF, Obeid AT, et al. Direct vs indirect restorations for diastema closure: determining the suitable approach. Gen Dent. 2023 Sep-Oct;71(5):53-57.
4. Bassett JL. Esthetics built to last: treatment of functional anomalies may need to precede esthetic corrections. Compend Contin Educ Dent. 2014 Feb;35(2):118-2.
5. Rivera M, Blatz MB. Leveraging digital smile design technology in esthetic restorative dentistry. Compend Contin Educ Dent. 2024 Nov-Dec;45(10):498-502.
6. Norris RA, Brandt DJ, Crawford CH, Fallah M. Restorative and Invisalign: a new approach. J Esthet Restor Dent. 2002;14(4):217-24.
7. Stanley M, Paz AG, Miguel I, Coachman C. Fully digital workflow, integrating dental scan, smile design and CAD-CAM: case report. BMC Oral Health. 2018 Aug 7;18(1):134.
8. Abdulrahman S, Von See Mahm C, Talabani R, Abdulateef D. Evaluation of the clinical success of four different types of lithium disilicate ceramic restorations: a retrospective study. BMC Oral Health. 2021 Dec 7;21(1):625.
9. Klein P, Spitznagel FA, Zembic A, et al. Survival and complication rates of feldspathic, leucite-reinforced, lithium disilicate and zirconia ceramic laminate veneers: a systematic review and meta-analysis. J Esthet Restor Dent. 2024 Nov 10.
10. Zhao K, Wei YR, Pan Y, et al. Influence of veneer and cyclic loading on failure behavior of lithium disilicate glass-ceramic molar crowns. Dent Mater. 2014 Feb;30(2):164-71.
11. Malchiodi L, Zotti F, Moro T, De Santis D, Albanese M. Clinical and esthetical evaluation of 79 lithium disilicate multilayered anterior veneers with a medium follow-up of 3 years. Eur J Dent. 2019 Dec 3;13(4):581–588.
12. Bilello G, Fazio M, Amato E, et al. Accuracy evaluation of orthodontic movements with aligners: a prospective observational study. Prog Orthod. 2022 Apr 11;23(1):12.
13. Vijaya S, Vijaya S, Shetty MJ. Management of midline diastema in a young adult with minimal-thickness porcelain laminate veneers. Cureus. 2023 Jul 14;15(7):e41904.
14. Teixeira EC, Turssi CP, Hara AT, Serra MC. Influence of post-bleaching time intervals on dentin bond strength. Braz Oral Res. 2004 Jan-Mar;18(1):75-9.
15. Spyrides GM, Perdigão J, Pagani C, Araújo MA, Spyrides SM. Effect of whitening agents on dentin bonding. J Esthet Dent. 2000;12(5):264-70.
16. Kim E, Son T, Lee Y, Jung B. Development of polarization dental imaging modality and evaluation of its clinical feasibility. J Dent. 2012 Jul;40 Suppl 1:e18-25.